

Introduction
In Java 9, another module framework was introduced. Modularity makes it simpler to compose encapsulated code by separating enormous codebases into little parts. So, for what reason was a module framework introduced? This can be explained by examine visually at the JDK itself.

Prior to Java 9, the JDK was one extensive solid structure. Regardless of whether you just needed to compose a small application, you still had to have the entire immense JDK on your machine, even if you weren't utilizing a lot of it. This made it challenging for developers and organizations looking for Java Outsourcing Company for more lightweight and efficient solutions. Another issue was that the old pristine code or code with security vulnerabilities was complex to eliminate. Removing it would lead to backward compatibility issues, further complicating the development process.
Overview of Module JDK 9
The answer for this complication was to present modules. This implied the JDK could be broken into little sections. Old inheritance code could be taken out and so could codes that are not utilized frequently. Anything extra can be included if necessary. On the off chance that there is a need to utilize lots of the accessible modules, these can without much of a stretch be brought into the application.
Along these lines, the module framework has been utilized to separate the JDK itself. But it can likewise be utilized for Java application development. Existing Java apps can be made modular as well. Java is regularly utilized for building huge apps, and generous code bases are not exceptional. Organizing large apps can be troublesome. But Modularity is a valuable tool for lessening their complication.
Why Module?
So, later you can notice how modules improve the developer experience.
- One of the core features of any programming language is the ability to reuse the code, and the extensive program can be built from small programs. In Java, the basic unit of reuse is traditionally the “class”. In java, for reusing class, we have inheritance mechanism and interfaces for reusing the abstraction.
- However, when your java program gets to be 5, 10, 20 or 30 packages in 2, 4, 8, 16 java files then it becomes difficult to visualize how all those classes and interfaces will interact which means it’s hard to control who is reusing what.
- The only way to share code between the packages is with the public modifier, but then the code is shared with everyone. A package is a great way to organize the classes. So, here “Module” would let us organize the packages. The module is nothing but the set of packages which can be reused.
- Module is a long-overdue building block in java language. In effect, modules recalled to the structure of your program so that the parts you want to be reused can be reused while the parts you don’t want to be reused cannot be reused.
- A program built of modules will be more reliable than a program built from a loose set of packages in jar files that can access each other freely and that exposure to many APIs’ to the outside world.
- Java base module is the foundation of every java program like lang object is the root of every class. The packages of “java.base” module intended for use by code outside the module. These are its exported packages. The packages that are internal to the java.base module can be used by code inside the module but not by code outside the module. These are its concealed packages.
- A module is declared in a new kind of file called module-info.java. It gives the names of the modules and its exported packages by exporting the java.lang package it means the public classes of java.lang are accessible from outside java base. A package that is not explicitly exported is concealed. Its public classes are not accessible outside java.base. Ex:
Anatomy of Module
- A module is a troop of related code. In this way, it contains some code, and it may contain some different assets as well. It likewise must have a name like bundles in Java. Module names live in the Global namespace, and they should be one of a kind.
- That implies which each single java module in presence ought to have an alternate name. With packages, this is regularly accomplished by utilizing an organization domain name, for instance: "mycompany.mypackage". A comparative thing should be possible with Modules. For instance, you can call it "com.mycompany.mymodule".
- A module likewise contains some data about the module itself. Of course, everything in a module is covered up to the rest of the world. Regardless of whether a class is open, it is really not available outside of the module.
- In any case, module has a module descriptor. This can be utilized to indicate if the code in the module ought to be available to different modules. The descriptor can likewise be utilized to state if code from different modules will be utilized. This is a convenient method to ensure the code is exemplified. Just the code that is required can be made noticeable to the rest of the world, and it makes organizing huge code bases significantly more convenient.
Creating a Module in Java:
-
In this example, I have created a very simple Hello World Application I want to make it modular. My program has one package called hello world and one class called Greeting, and this class has a main method that prints the Hello World.
public class Greeting { public static void main (String[] args){ System.out.println(“Hello World “); } } - All I need to do is to make it modular is to add something called a Module info file. This is the file that describes my module, and it relates to other modules. To do this in any IDE, you can right-click on your projects in the Project window on the left and then select “New” and then Java Module Info.
-
Then a pop window will appear, and which will tell us that the name of the file will be the module-info. This name cannot be changed, and this type of file will always have to be called module-info.java. And then click on “Finish”. Please find the screenshot below:
![Modular Programming in Java]()
-
Now, I have created a simple modular application with the module-info file. Just having this fie in existence makes it a modular application. All it contains is the word module followed by the name of my module for Ex: HelloWorld.
module HelloWorld{ }

Note: The name has to be the same as the name of the directory it is in. In my case, the directory is called “HelloWorld”. So, my module must be called “HelloWorld”.
-
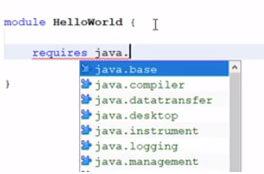
There are two things I can do in this file. One of these is to specify if I want to use any other modules. To do this, I type “requires” between the curly braces and the name of the module. For example, I might want to use a module n the JDK that is not included by default. If I start using Java, then you can get many options like below so that we can add the module from the JDK:
![Modular Programming in Java]()
- Suppose, if I want to use a buffered image in my application, then we can use “BufferedImage image”. But this won’t work. For this to work, we have to use this module. So, in our module-info file, we have to use “requires java.desktop”. Then only we can able to import the BufferedImage class without any issue.
- The second thing I can do with the module-info file is export packages from my module. At the moment, nobody else can use my HelloWorld class. Suppose, if I write “exports helloworld” in my HelloWorld module, this will make the helloworld package available to the whole world. This is real modularization, choosing what can and cannot be seen by the outside world.
Understanding Modular Structures
- More often than not, when working with Modular apps, there will be many modules. In Eclipse/STS/IntelliJ, it is easy to make a multi-module venture. Go to file, create a new task and afterward select "Java Modular Project". And afterward click next and give project name and lastly click Finish. Afterwards, you can begin adding modules to your task.
- Once you create the project, then right-click on your project and then go to New -> Module and then the module will be created for you. Give your Module name and click finish. Similarly, create your second module. The IDE will create module-info files for you.
-
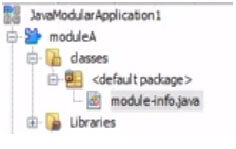
In the project window, if you expand moduleA, and then look inside the classes and then default package. If you expand, you can see the module-info.java file.
![Modular Programming in Java]()
-
Another module what you created to have the same structure. The next step is to create some packages inside my modules. Like an ordinary way, you can create the packages inside your two modules. Next, you create a java class to put in it. You can click on the package and create a class under that.
![Modular Programming in Java]()
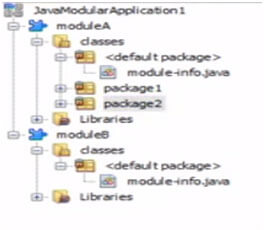
- So, in the above image you can see how a simple modular application will look like. So, in your src directory, two modules are created moduleA and moduleB. Inside moduleA, we have package1 and package2 and then the module-info file. Module-info file is at the same level as the packages.
Working with Multiple Modules
- I am going to explain with an example where I have a simple application for booking appointments with Designer. This project is inside the exercise folder directory. If you are using the project, you need to make sure that the exercise folder begins with small ‘e’ and not capital ‘E’ as this can cause a pattern intact exception to be thrown. I want to use modularization to make sure that I have an excellent encapsulation in my program.
- I have created two modules one is called “customer”, and the other one is called “bookingsystem”. Inside the booking system module, I have two packages. One is called employees, and other is called “scheduling”.
- With the more extensive application, it becomes very easy for building applications that are flexible and maintainable using the module.
I am not going to explain here programmatically as you can refer your advance blogs for more details regarding modular programming.
Running Modules from Command Line
-
Compiling and running a modular application from the command line is slightly different from compiling and running typical java applications. This is all done when using an IDE, so this time, I will be using a project that I made in a simple notepad application. I am currently in the bein directory as you can see below:
![Modular Programming in Java]()
-
And here you can see, I have an application called “ModularExample”. Inside that, I have a directory called “src”. And inside that “HelloWorld”. This is the root directory of my module.
![Modular Programming in Java]()
-
Note here that it’s the root directory because in here I have the module-info.java file.
![Modular Programming in Java]()
-
If I open this file, this is an elementary file with module helloworld{} written in this file. It does not require or export anything. At the same level in my directory structure, I have a folder called “com”. And in that folder, I have another folder called “greeting”, and then inside that folder, I have a java file named as “HelloWorld”. In this file, I have a simple main() method as below:
public class HelloWorld { public static void main (String[] args){ System.out.println(“Hello World “); } } - So, you can see in the above example that this is a very simple class with a main method that prints out “Hello World”.


How to run from the Command Line?
-
Now, I will go to my command prompt, and now I am inside my “ModularExample” directory. I will compile my application similarly to when I’m compiling a normal java application. For compiling the application, I have to execute the below command:
javac -d output/helloworldsrc/helloworld/com/ greetings/HelloWorld.javasrc/helloworld/module-info.java - “-d” flag is used to specify the output directory. In our case, it is output.
- Unlike a normal java program, I have to output the compiled files to a directory with the same name as a module. Here my module is called “HelloWorld”. The slash I have used is a forward slash.
- Next, just like normal java program, I put the name if the java class I want to compile. In our case, it is “src/helloworld/com/ greetings/HelloWorld.java”.
- As it is a modular application, I also need to add my “module-info.java” file. So, I have put in the command “src/helloworld/module-info.java”.
-
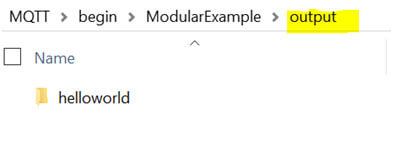
Now, you can press enter, and the above command will execute, and it’ll compile our code, and now you can see that the “output” directory will get created as per below screenshot:
![Modular Programming in Java]()
- And inside this HelloWorld folder, we will find our compiled classes. Now, I can run the module from the command line. I will use the “java” command to do this. In java 9, some new flags were added to the java command for dealing with modules, and these are very special flags, and you will find it interesting.
- One of the flags is the “module-path” flag. With the modular application, modules are not resolved from the normal class path but the module-path. The class path is well known for creating problems for developers. For example, If classes cannot be found or duplicated, this is known as class path hell as you may end up with class not found an exception.
-
The module-path however, only has modules on it because modules have the module-info file. They are relatively easy to index because the java runtime and compiler knows straight away what dependencies are needed. So, I need to use --module-path and the argument I should pass to this is the directory containing my compiled module which is output. Then I’ll use the “--module” flag and should put the name of the module “HelloWorld” followed by the slash and the class name which I want to run. I separate the directories with a dot. So now the final command would look like as below:
java --module-path output --module helloworld com.helloworld.HelloWorld - Now, if you run the above command, we will get the output as “Hello World” as per our code that we print inside the main () method.
-
I can also shorten this by putting “-p” instead of “--module-path” flag. And then I can use the “-m” flag instead of using the “--module” flag. So, the shorten command would look like as below:
java -p output -m --module helloworld com.helloworld.HelloWorld
NOTE: So, if I run this command, I will get the same output.
Conclusion
Here I have explained the basic modular programming and essentials of using modules introduced in Java 9. Also, elaborated the advantage of modules, mainly in the aspect of building large software development. I believe this blog would be helpful for you to be more familiar with the modularity concepts.