
Technology: The Canary release new technique in the software world to reduce the risk of introducing the new version of the product by slow roll out the changes to the small subset of users before rolling out to the entire infrastructure, thus making available to all users.
We can be deploying the latest version of the software component to a subset of the infrastructure, and no users have routed to this path.
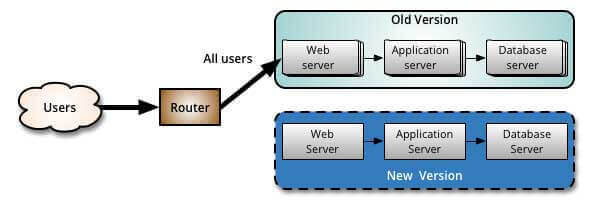
Once our testing is over, we can route some users to the new path, there are different strategies to select users, and some of the companies will choose the internal users for routing the new path before releasing to the world.
As we have gained confidence and no issues in the new software, we can deploy on more infrastructure and route more users, and we can change the aging version to a newer version.
The advantage of canary release is, we have the ability to testing the new version in a production environment if any major issues are found, safely rollback to the previous version.
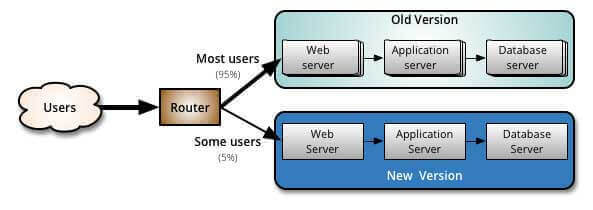
Canary deployments using Load Balancers
It is easy to canary deployments using Load Balancers. We will proceed with two load balancers. Load Balancer A will receive the 95% of the traffic, and load balancer B will receive the 5% of the traffic. (The percentages will vary based on how much percentage of users we want to allow for a new version of the product). There is no limit to the number of servers connected to each load balancer. It is important that traffic is a divide between load balancers.
When we are done to attach the servers with load balancers, we can verify for a while, and if we found any issues/errors we can easily rollback the release, but if a new version is working fine we can proceed to update the servers behind the load balancer A.
Prerequisites software(s) need to be installed in system:
- Docker Edge: Need to install Docker Edge as it comes with local kubernetes installation, if we have installed docker, uninstall it and install docker edge, it supports in both Windows and Mac, Linux based operating systems.
- Minikube It is also supported on the Windows system, but then the Doctor needs to be installed in non-native fashion.
- Kubectl: It is used to interact with Kubernetes using the command line.
Once we have above specified software are installed, we can start creating the docker images for our applications.
-
Create Docker image for application:
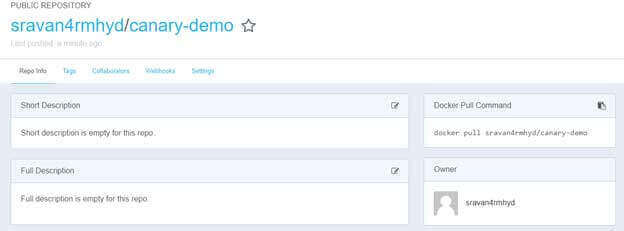
Generate the application docker image either using fabric8io docker maven plugin, or we can use Google Jib plugin for generating and push to docker public repository.
-
Deploy docker image to Kubernetes:
Now we have initial version of application image, we can deploy into Kubernetes. We need to create loadbalancer using Kubernetes service
Service definition for creating Kubernetes service:
Create file canary-service.yaml. and add below content.
apiVersion: v1 kind: Service metadata: name: helloworld spec: type: LoadBalancer ports: - port: 80 selector: app: helloworld service will going to select the pods with label “app:helloworld”, the pods with label are going to bind to this load balancer.
kubectl apply -f canary-service.yaml
the above command is used to create kubernetes, if the service already presents then it will update the service with new configuration.
Now let`s create deployment, using deployment definition provided by kubernetes. Create file called canary-deployment.yaml and add below content into it.
apiVersion: apps/v1beta1 kind: Deployment metadata: name: helloworld spec: replicas: 2 strategy: rollingUpdate: maxSurge: 1 maxUnavailable: 1 minReadySeconds: 5 template: metadata: labels: app: helloworld track: stable spec: containers: - name: helloworld image: sravan4rmhyd/canary-demo:1.0 ports: - containerPort: 80 resources: requests: cpu: 50m limits: cpu: 100m Here we are creating 2 pods, with image sravan4rmhyd/ canary-demo, and it will have labels “app:helloword” and “track:stable”, these pods will bind to above helloworld service, as required label are matched.
Create a deployment using below command:
kubectl apply -f canary-deployment.yaml
After the command successful, we can verify the service and pods using below commands.
kubectl get pods
This command will all pods created during the deployment, and kubectl get service
This command will show all services and it will also show the external IP of the service. In my case it is “localhost”
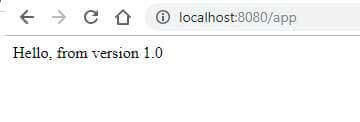
Navigate to http://localhost/api/ and we will see the below output:
-
Creating docker Image for second version of the application.
Update the content in Helloworldcontroller.java to display 2.0
package com.example.demo; import org.sprlngframework.web.bind.annotation.ReqtJertMapping; import org.springfromowork.web.bind.aonnototion.ResttController; @RestController public class HelloworldController { @RequestMapping("/app") public String getl1illoworld () { return "Hello, from version 2.0" } } And create and pull the docker image to repository.

-
Deploy second version to Kubernetes using canary:
Deploy the new version of application using below descriptor file:
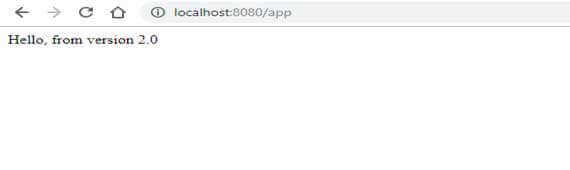
apiVersion: apps/v1beta1 kind: Deployment metadata: name: helloworld-canary spec: replicas: 1 strategy: rollingUpdate: maxSurge: 1 maxUnavailable: 1 minReadySeconds: 5 template: metadata: labels: app: helloworld track: canary spec: containers: - name: helloworld image: sravan4rmhyd/helloworld:2.0 ports: - containerPort: 80 resources: requests: cpu: 50m limits: cpu: 100m One additional pod is created and running with new version.
Total 3 pods are created, 2 of them are running with version 1, one pod is running with version 2. 33% of traffic will be diverted to pod with new version.
For some of the requests will return response below:
-
Rollout the new version to all pods
Update the deployment descriptor file image property pointing to version 2.0
image: sravan4rmhyd/helloworld:2.0
and re-execute the deployment command to update the containers in pods.
-
Remove canary deployment:
We can remove canary deployment using below command:
kubectl delete -f <canary-deployment-file-path>.
Conclusion
Expert Java Developers have described how to create a service and deployment in Kubernetes and how to release an application in a canary way so that only a small amount of users will see its new version after it has been transferred and how to prevent all the fuses in the service and canary Deletion of canary Deployment.