

Introduction
In the MVC pattern, Model binding maps the HTTP request data to the parameters of a Controllers action method. The parameter can be of a simple type like integers, strings, double, etc. or they may be complex types. Modelbinder MVC then binds the request data to the action parameter by using the parameter name.
Model binder provides a mapping between the request data and the application model. The default model binder which is provided by ASP.NET Core MVC supports most of the common data types and would also meet most of our needs. With custom model binding, you get the freedom to describe your individual instructions and rationality for mapping the inward data to your convention model. The built-in model binding functionality can be extended by implementing a custom model binder which transform the input prior to binding it to a model.
Solution
For creating a custom model binder class, we have to inherit from IModelBinder interface. This interface has an async method named "BindModelAsync" and it has a parameter of type ModelBindingContext. The ModelBindingContext class provides the context that model on which the binder acts.
Example
Let us implement a custom model binder that can convert incoming request data which is passed as query string to a user defined class. The request data is the one which contains all model properties separated with pipe (|) and even our custom model binder and it will separate the data and assign them to the repspective model property. ModelBindingContext shortens and improves the data binding procedure, authorising programming to proficiently grip and procedure data in their website apps.
Model Binders: Why, How, and How to Test
1. Model Binders, why?
In ASP.NET Core, Model Binders are called to play a pivotal role in making the procedure of data binding simple. It is important to know the binders serve the purpose of a bridge that fixes the course of application and requests of incoming HTTP. When developers make use of the model binders, they can chart out incoming data which they can submit without any hassle. Through model binders, developers can also question strings and make the parameters of the action controller.
Moreover, Imodelbinder caters to pliability when developers tackle numerous formats of sources and data. It lets developers personalize behavior binding based on particular needs. Whether you tackle complicated items or normal types of data, model binders make the method of charting out inward data to the related parameters which further help developers get accurate methods of data.
2. Model Binders, How?
While dealing with ASP.NET Core, using integrated they could make the data binding process simpler. Model binders are important in playing an imperative part in charting out data from requests of HTTP to the process of action restrictions. Developers should know model binders make the procedure of executing and accepting data from other foundations.
ASP.NET Core offers various integrated model binders that could easily deal with various types of data that can be transformed into suitable types that are expected from your process of action. When you make use of integrated model binders, developers can concentrate on developing logic apps instead of changing inward data.
Whether you are operating with normal data such as complicated items or strings, it is necessary to know and effectively use integrated model binders. It will also help increase the efficacy and sustain applications of ASP.NET Core. As you become proficient in model binders, you can make the process of data binding simple. You can also make the process of data binding strong.
3. Model Binders, How to test?
The tests are rather easy to understand: primary. After that, we get a duplicate of the obligated, and later we give an instance of the DbHelper to the constructor. Next, we make a mock of the ModelBindingContext After that, we create the title of the data element as well as the query language.
Model Binder Basics
All developers understand the worth of clean and efficient code. With the help of powerful tools ASP.NET MVC and Core are pivotal to dataflow. It encompasses its movement between your views, controllers, and replicas.
Model binders act as intermediaries by taking data through many sources in an HTTP request (such as type fields, way data, or query threads). They automatically mapp it to your application's model objects. The primary 3 tasks are to handle:
1. Data retrieval: They fetch data from different request parts based on naming conventions (e.g., form field names matching model properties).
2. Type conversion: They transform string data from the request into the appropriate .NET types required by your model properties (e.g., converting a string "25" to an integer).
3. Model population: They populate instances of your model classes with the converted data.
The WeekOfYear ModelBinder
Let's say you have a model property called ‘Week’ that needs to store the current year’s week. The built-in model binding system doesn't have a specific binder for ‘WeekOfYear’ by default. You can leverage the extensibility of model binders to create a custom one. It would understand how to extract the current week number from the date provided in another field of your form. Then it would populate the ‘Week’ property accordingly.
Model Binder Providers
The expanding functionality of model binder providers applies to The ASP.NET MVC framework. A custom model can be created for specific cases. Specific binding logic and integration are possible with 3rd party integration or libraries in case data manipulation is required.
Developers can unlock the potential of model binder basics by learning the mechanisms. Dataflow can be simplified and streamlined in different applications. If you are a developer looking to save effort and time, this is the best method.
Default Model Binder Limitations
It is essential to fulfill the requirements of developers when it comes to defraud model binders which keep up various types of NET Core data. Developers should know how to insert instructions that are basically on content. The content-targeted input needs to be inserted in various kinds of models in one go. Developers have to convert data before attaching it. For instance, if developers have a way out that could be made into use in model data, they have the leverage to implement a customized model binder which will help derive news through the right process.
Steps involved in creating a custom model binder.
First step
Once the model is created using the request data, we then have to assign this model to Result property of the binding context using ModelBindingResult.Success method. This method represents model binding operation was successful. Same as the Success Method, It has also a method name “Failed” it represent a fail model binding operation. As a whole, with the use of custom model binder in asp.net core gives developers with a controlling tool having data binding procedure and safeguarding where their app precisely captures and procedures user involvement.
Now, the next step is to register a Model binder. We have two ways to register Model binder:
- Using the ModelBinder attribute
- By defining model binder provider and then register it in startup class
Register custom model binder using ModelBinder Attribute
We can apply a custom model binder using ModelBinder attribute by defining attributes on an action method or model. Whenever we are using this method that is applying attribute on action method, we need to define this attribute on every action method which we want use this custom binding on. Also, we can apply this attribute on model it-self.
Applying the ModelBinder Attribute on a Model
Applying ModelBinding Attribute on Action method
Register custom Model binder in startup class
Also, we can register our custom model binder in a startup class which will then be available for all action methods. To register a custom model binder, we have to create a binder provider. This model binder provider class implements an interface called IModelBinderProvider interface. The built-in model binders, it should be noted that, have also have their own model binder providers. With model binding in mvc c# process of capturing and manipulating data from user inputs. We can also specify the type of arguments model binder produces, not the input of our model binder. In following example, provider works just with "CustomModelBinder".
Custom Model binder provider
Now, we have to add this provider to MVC model binder provider collection.Then we can add custom model binder provider to MVC model binder collection. i.e. in the ConfigureServices methods of the Startup class.
Output
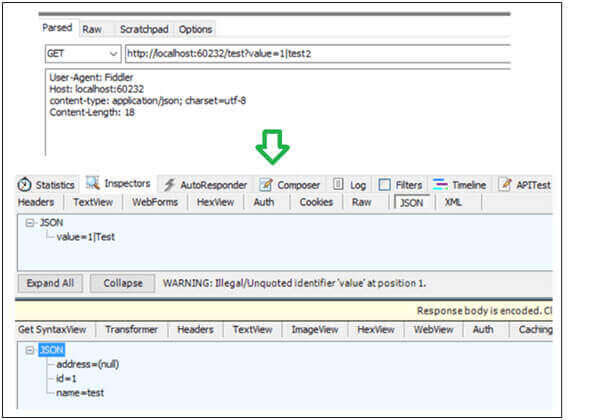
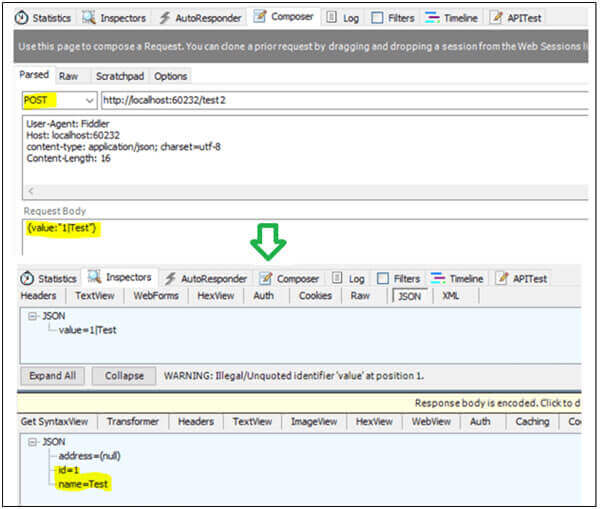
In the above example, we are receiving the required data from the request (query-string). In the same way, we can also get the data from request body. With the post method, we need to post the data within request body. In the following example, I have read the request body data and converted it in to required form-data.
Model Binder
Output
Impact
With Customer binders, we can get data whose properties are not primitive. This gives us a better control of the data and thus helps us in some scenarios. Overall, the model binder in ASP.NET Core is crucial tool for effortlessly handling data, creating the development procedure evener and more useful.
Model Binding Simple and Complex Types
When it comes to binding models, developers need particular clarifications or annotations that would meet specific types of operations. But making use of TypeConverter, a simple method is transformed with the help of a string. Complicated types of models are transformed from countless data uses. It is a structure that decides the distinction depending on the presence in TryParse. Developers are suggested to make a type of converter by implementing TryParse. To change it, you would not need outside sources.
List of types that the Model Binder can Convert from Strings
Before deciding to make a personalized model binder, one needs to assess the current model binders that will be incorporated. Take into consideration ByteArrayModelBinder which can be utilized to transform strings into byte arrays.
Working with the ByteArrayModelBinder
It is necessary to personalize Byte Array Model Binder which lets developers match the functions which in turn will meet the particular needs that will be distinct to the ap The modernized level of personalization permits developers to tackle plots with effectiveness and accuracy.
Polymorphic model binding
If you connect various kinds of models of distinct types is known as polymorphic model binding. It is needed when the value is attached to a particular kind of model. It is not classic for a REST API which is tailored to concord with various types of languages. As a result, it turns out to be tough to cause deduce bound models. A REST API that is intended to be compatible with all languages does not often behave in this manner. In this way, it becomes more challenging to reason about the bound models.
Recommendations and Best Practices
- It must not be utilized to transform a string into a type of custom which proves to be the right choice.
- They are quite useful and can remove repetitive code from methods of action.
Make sure not to try to make use of status codes. In case model binders do not function, an action filter which is in the method needs to tackle the errors effectively.
Conclusion
ASP.NET Core has many built-in model binders and their providers that meet almost all our needs. However, a custom model binder provides a way to bind data that is in a specific format to our model classes or action parameters. For more advanced development solutions, you can also explore services from a ASP.net development company like Aegis Softtech.
.Net developers India have shared this to understand the concept of Custom Model Binding in ASP.NET Core pattern and its use in MVC based application development.