

Docker is one of best tools for containerization tool for creating images. Docker provide the layered architecture, using which it will not take much space on disk and also if any pf the layer already existed on disk, it will as use the storage.
By default docker, will not have experimental features, we need to enable to see the latest features on docker, similar to the one we are going to learn in this blog.
Enabling Experimental features:
Open the file ~/.docker/config.json add the "experimental": "enabled" key in this json file and restart the docker service. For resting microsoft ERP services, commands will vary from one OS to another.
Verifying the Experimental features enabled:
Execute the docker version command to see the experimental feature is enabled or not.
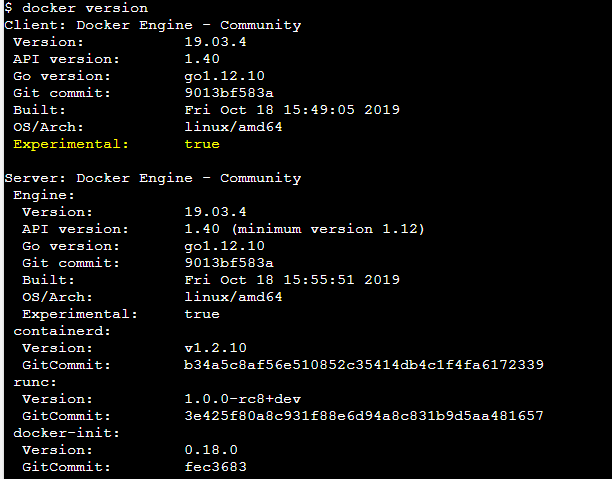
In the highlighted text, we can show the experimental is true.
Supporting multiple CPU architecture support:
Due to different CPU available in market for different purposes, we don’t know the target CPU on which our docker image will deploy. In some cases, some of the instruction may not work in some of CPU architecture because of CPU architecture limitations. so we need to specify what are the different architectures our image will work, and if need to we needed no build different image for different CPU`s.
If the local docker supports multiple CPU support, docker build will command will bind to local CPU architecture and OS.
While running the docker with multi-architecture support, docker will automatically select the image which supports OS and architecture.
We are here to help you out by providing services for creating multi-arch images using docker.
Most docker base images,and official images are supporting multi-architecture support.
Buildx is one of the docker-cli plugin for creating multi-arch images.
Check docker buildx version is command to verify buildx plugin is installed or not.
If it not installed below are the steps to install:
Next verify the plugin is installed successful or not using same above command:
Dockerbuildx version.
We will understand the multi-arch images using an alpine image.
alpine is the linux based small sized image.
First we will check what are the different os and architectures it will support:
docker buildx imagetools inspect alpine
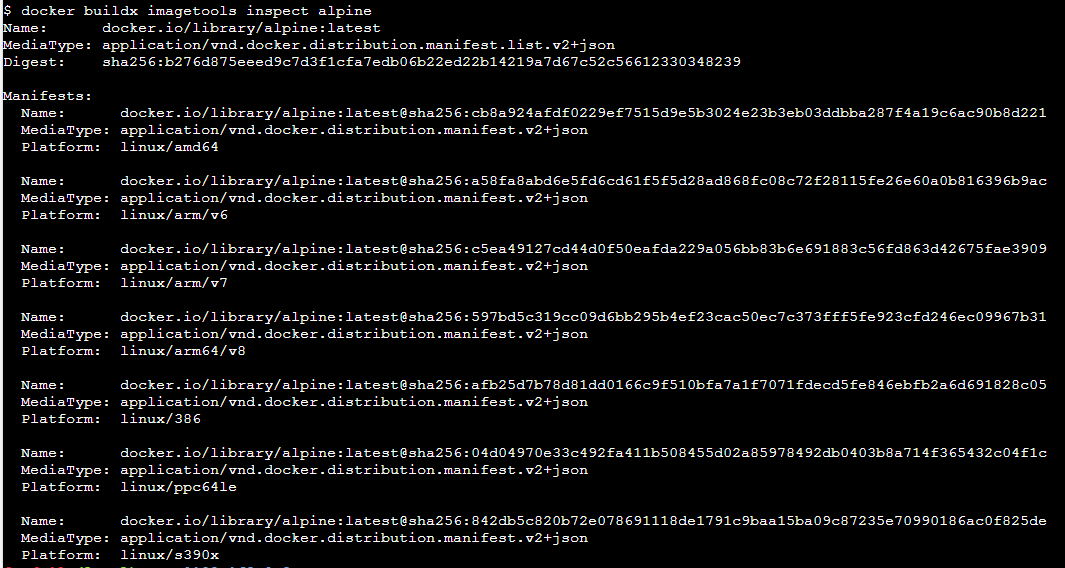
We will observe different platforms for different architectures, and also docker image layer id is also different for each platform, means different image layer id for different architecture.
We can see the same information in json file format by adding --raw argument.
dockerbuildximagetools inspect --raw alpine
Use name value if you want to run the image which will execute on different architecture, as by default docker will pull the images based on local OS and architecture.
Creating Custom Multi-Arch Image:
Create a local docker image for each of the different OS and architecture with same image name and different tag.
Alternatively using buildx plugin we can do all these steps in single command.
Docker cli will depends on the driver to push the images to registry, which also need to support multi-arch.
Docker buildx ls is the command will display all the existing builders.

The default driver will support for linux/amd64 and linux/386 OS and arch combinations, if any other combinations it will not support, for that we need to other builder docker buildx create command by specifying the supported platforms.
And check docker buildx ls command is our builder is present or not.
Next Bootstrap the builder with below command:
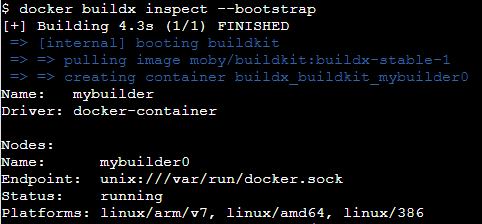
Our new builder will bootup and available for building the images.
Next execute the command will see the below output:
Then we can use docker buildx imagetools commands to check Manifests.
Conclusion:
Hire Java Developers for secured programming on your project. Here Developers team explains about Multi-Arch Docker image, with the existing Docker hub image, and also how to enable experimental features. In the last, you learned about the builder and creating a custom image that supports multiple architectures.