
DESCRIPTION
In any software product, the aspect of Security perhaps plays the most important part. Microsoft Dynamics 365 CRM Consulting, D365 - Customer Engagement too, the developers must ensure that there are no security breaches when it comes to making configurations and customizations.
In this blog, we are going to learn how a CE developer can hide or display a Ribbon button depending on what the Entity Privileges are in the Security Roles assigned to the signed-in user. Let us consider the following real-time scenario:
There needs to be a custom Ribbon Button on the Case main form labeled – Under Review, on click of which the status of the Case record gets updated to Reviewing. But this button must be visible to only those users who have a ‘Write’ privilege to the Case entity in any of their assigned security roles. For others, the button must be kept hidden.
PRE-REQUISITES
1. A valid Dynamics-365 CRM Instance
2. Ribbon Workbench – To create and edit our custom ribbon buttons.
Aegis Softtech will assist your organization’s systems with the best configurations. Reach out to us for specific requirements.
The latest version can be downloaded from the official website – https://www.develop1.net/public/rwb/ribbonworkbench.aspx
STEPS
-
1. Sign in to your D365 CE instance (as a System Administrator) and create a new JavaScript web resource to add as a command to our custom button. Copy the following JS code to your web resource.
// JavaScript source code function UpdateCaseStatus(primaryControl) { //Pass primaryControl CRM Parameter from Ribbon-Workbench var formContext = primaryControl; var entityId = formContext.data.entity.getId().substring(1, 37); var incidentData = { statecode: 0, statuscode: 4, }; //Update case status to Researching Xrm.WebApi.updateRecord("incident", entityId, incidentData).then( function success(result) { formContext.data.refresh(true); }, function (error) { formContext.data.refresh(true); } ); } -
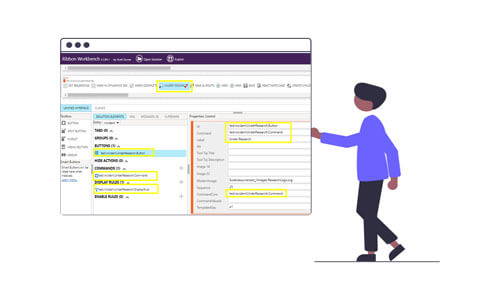
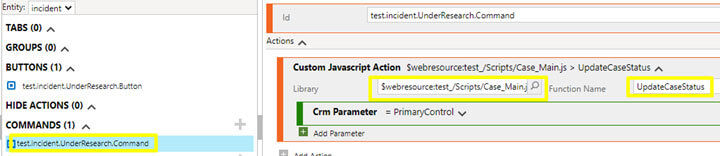
2. Add a custom button labeled “Under Review” on the Case entity’s main form in the Ribbon Workbench. Add the created JS web resource as the command to this button.
![Customer Engagement]()
Command:
![Customer Engagement]()
-
3. Add a Display Rule to the command wherein we specify that the button would be visible only to the users with at least one assigned security role having the Write privilege to the incident entity. Refer to the screenshot below.
![Customer Engagement]()
-
4. Publish these customizations in the Ribbon Workbench.


UNIT-TESTING
-
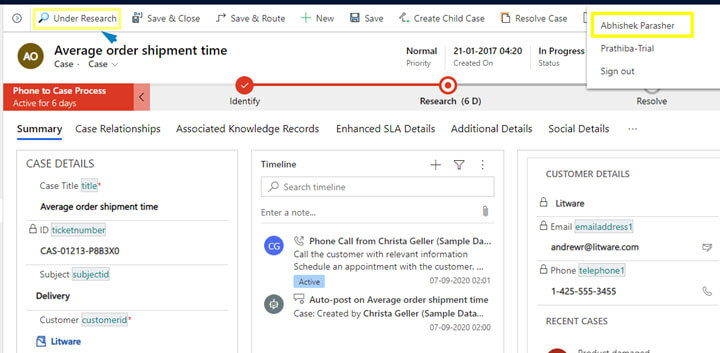
I. Open a case record as a system administrator. You must be able to see our button.
![Customer Engagement]()
-
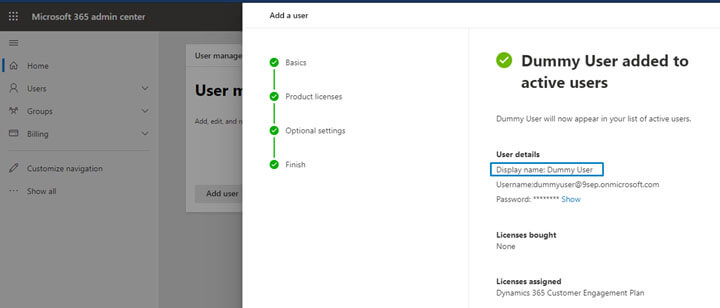
II. Navigate to the Admin Center and create a Dummy User.
![Customer Engagement]()
-
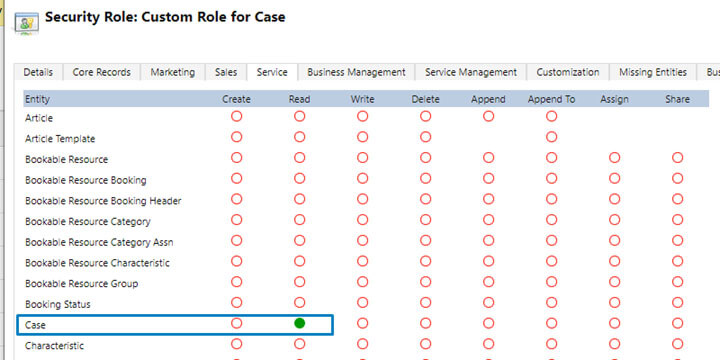
III. Create a custom security role that has only Read entity privilege (NOT Write) to the case entity.
![Customer Engagement]()
-
IV. Assign the security role created above to the Dummy User. [Note - To allow the Dummy User to successfully login, we assign one more basic security role like Common Data Service User (having no privilege to the Case entity)].
![Customer Engagement]()
-
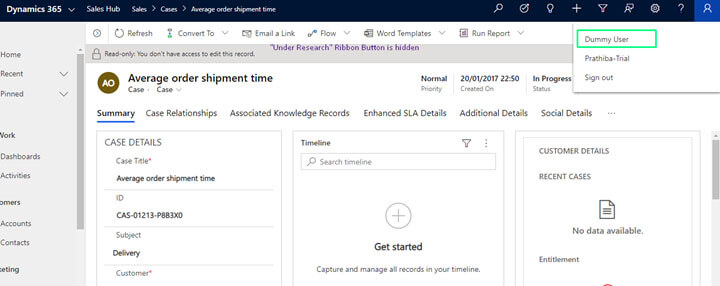
V. Finally, login to CE as the Dummy User and verify if our custom button – Under Research is hidden.
![Customer Engagement]()

Using Miscellaneous Privilege in Security Roles
A helpful tool that gives users the ability to manage access to certain operations inside Dynamics 365 is the Entity Privilege Rule, which can be found in Ribbon Workbench. Depending on the security role of a user, administrators can limit or give access to certain buttons or instructions inside the ribbon interface. This happens via the definition of entity privilege rules. With this degree of customization, companies can personalize the user experience and guarantee that only authorized users can carry out specific operations inside the system. Managers can fine-tune the CRM interface to fit the specific security needs of their business, thanks to the entity privilege rule in the ribbon workbench. This results in a user experience that is both more streamlined and safe.
Using Entity privilege
The name of this feature suggests that you can display a hidden button depending on the level and type of particular entity privileges. Within Dynamics 365, this is a beneficial function. Only one entity has to be defined, and based on the permission type and depth, you may choose whether or not to display or conceal the button. Let's say, for instance, that you wish to hide the fact that a user does not have any access to the "new_tesentity" entity. In this case, you may build the following rule.

What does Enabled Mean?
The phrase "allow" often denotes the condition of coming with the feature, operation, or alternative active or switched on. Enabling anything indicates its state of being operating, functional, or permissible for use. The ribbon displays disabled instructions, which are viewable though unresponsive to occurrences.
Control When Ribbon Elements are Displayed
By understanding the presentation ideas in instruction definitions, you can make use of presentation instruction for several command descriptions. While not just one but many more, There is a presentation regulation in place for the meaning of the option; for the string component to be shown, each of the demonstrated standards must be evaluated as real.
Every presentation regulation offers a non-compulsory limitation to stipulate if the avoidance worth of these restrictions is correct or not correct and a non-compulsory InvertResult parameter to allow getting back to the undesirable result while the things are quite verified revenues fact.
The /RuleDefinitions/DisplayRules/DisplayRule parts are compatible with the subsequent categories of rules:
<CommandClientTypeRule>Defines a rule that can identify the sort of presentation that is currently applied
<CrmClientTypeRule>Let's define rules depending on the type of client used. Type options are as follows:
- Website
- Outlook
Determine if Dynamics 365 for offline Microsoft is now offline by using this criterion to show an interface component depending on the status of the application.
<CrmOutlookClientTypeRule>Work on this rule in case you wish to show a button for the particular kind of Dynamics 365 for Outlook. Type options are as follows:
CrmForOutlook
CrmForOutlookOfflineAccess
Control when ribbon elements are enabled
Permit instructions are designed to be used again. By using rule definitions, it is possible to use a single allow rule across multiple function implementations. If several activation conditions are specified for an action definition, all of these rules should be set to false for the ribbon item to be activated.
All enabling conditions have an optional argument to indicate the initial outcome of the rule as either. Additionally, there is an optional InvertResult parameter that allows for obtaining a negative result when the item that is tested responds positively.
Command Client Type Rule
This makes use of the <CommandClientTypeRule> component. Stipulates a situation that notices the kind of performance used.
The Type worth are parallel like below:
1) Value
Presentation
2) Modern
The command bar is presented for tablets using Dynamics 365.
3) Refresh
The command bar is presented using the updated user interface.
4) Legacy
The ribbon is presented in forms for tables that were not updated or in a list view in Dynamics 365 for Outlook.
CRM Client Type Rule
It makes use of <CrmClientTypeRule> and applied website and outlook structure to let the description of instructions contingent on the kind of customer applied.
CRM Offline Access State Rule
The Internet Access State Rule is a vital component of CRM systems since it guarantees that users may get and manipulate data regardless of the absence of an Internet connection. This functionality enables users to effortlessly carry out their tasks without interruption, even while not connected to the internet, by saving a duplicate of the data on their mobile device.
Custom Rule
Utilizes the <CustomRule> component. To invoke a function in a JavaScript online resource that yields an integer (Unified Interface) or a boolean (Unified Interface and web client), use this specific rule.
Note:
Custom rules with slow execution times might negatively impact the functionality of the ribbon if you need to do a logical operation that may require a significant amount of time to finish.
Entity Rule
Utilizes the <EntityRule> component. EntityRule enables the assessment of the existing table. This is beneficial when you establish customized actions that apply to the table template rather than particular tables. For instance, you could like to include a ribbon component in all tables, except a few specific tables. Defining the custom action for a table pattern that applies to all tables and using an EntityRule to exclude specific tables is a more convenient approach.
The EntityRule has an additional argument called "context," which may be used to indicate whether the table is being shown in the form or as a list (HomePageGrid). The optional parameter "AppliesTo" may be assigned the values "PrimaryEntity" or "SelectedEntity" to differentiate if the table is being shown in a subgrid.
Form State Rule
Utilizes the <FormStateRule> component. Utilize the FormState rule to ascertain the present form type that is exhibiting a record. The available choices are as follows:
- Generate
- Current
- Non-modifiable
- impaired
- BulkEdit
Outlook Item Tracking Rule
Utilizes the <OutlookItemTrackingRule> element. Utilize the TrackedInCrm attribute associated with this element to ascertain if the information is being monitored in the Power Apps system.
Outlook Version Rule
Utilizes the <OutlookVersionRule> element. To activate a ribbon element for a particular version of Office Outlook, use the following instructions:
2003
2007
2010
Page Rule
Utilizes the <PageRule> component. This rule examines the URL of the present-day page. The function returns a boolean value of good if the address given is identical.
Record Privilege Rule
Utilizes the <RecordPrivilegeRule> element. Apply this rule to ascertain whether the present user has rights on a certain record. Those freedoms are distinct from table privileges since they include privileges obtained by a different user who shares the record with the current user.
Selection Count Rule
Utilizes the <SelectionCountRule> element. Apply this condition to a ribbon shown for a list to activate a button whenever a specified range of records, defined by the highest and lowest quantity, is chosen in the layout. For instance, if the link you are referring to is responsible for merging data, it is essential to ensure that a minimum of two records are chosen before activating the contextual command.
Value Rule
Utilizes the <ValueRule> component. Apply this rule to verify the Value of a certain field in the information that's currently being shown in the form. Please provide both the Field and the Value that you would like to verify.
Show On-Quick and Grid Action Rule
Quick Action Rule
Utilizes the <EnableRule> element. Apply the following rule to display the command on the home page's grids and swiftly respond.
Grid Action Rule
Utilizes the <EnableRule> element. Apply this rule to only display the fast action option on the homepage grid. To clarify, this command allows you to conceal an already fast action.
Hide Show button on security role using JavaScript and ribbon workbench Dynamics 366 or Dataverse
Step 1: Create a JS web resource with code
You can construct a JS web resource. Insert the following code into the web page.
Upload the JS web resource as a solution and publish the web resource.
Step 2: Prepare Ribbon Workbench
Generate a novel solution and incorporate a table into it. Avoid including any additional sub-components or information.
Launch the Ribbon Workbench application. If you are unfamiliar with how to open Ribbon Workbench, please refer to my prior blog posts on the subject. Within the ribbon workbench, choose the option that includes the table and allow the ribbon workbench to fully load its contents.
In the ribbon workbench, choose the button for which you want to set the enable rule. After being chosen, click on the "Enable rule" area and either create a new rule or fill in a custom rule. Choose the JavaScript online page and provide the name of the function. Set the CRM parameter as the primary control.
Step 3: Test
Accesses and views student records. The button is perceptible for ribbon workbench display rule JavaScript. The option to access the student record is now hidden for other users with different roles. The test is successful here. You can modify the code to align with the specific requirements of your organization.
Separate Buttons on different Sub-grid based on the View
1. The strategy is to include distinct buttons on the sub-grids according to the "Name of the View."
By default, both buttons are included on your Ribbon Workbench. Initially, we will include the need to display the buttons only when a record is selected. The implementation of this feature involves the attachment of an Enable Rule to the Command of the ribbon button.
2. The buttons should be split according to the name of the view
To determine which buttons should be shown on the view above, we will use the Custom Rule method in Ribbon Workbench. This method involves using an Enable Rule that is linked to the Command, which is then connected to the actual button.
3. It will return true if the current View is the desired one
In the example below, we are determining the value of the selected control. If it meets the desired Enable Rule, the True or False value is set accordingly.
Code Samples
Below are the code examples that you may duplicate and alter for your experiment:
CONCLUSION
Hence, we comprehensively learned in this blog how we can hide or display a Ribbon Button based on the signed-in user’s Cyber security consulting services privileges, without having to write any code.
For Java development requirements, Aegis Softtech offers comprehensive Java Development Company to assist with the best configurations and customizations. Reach out to us for more information and support.
See you in my next blog! Take care and stay safe!