

After getting tremendous response from the readers, Aegis Softtech’s expert Java developers team once again brings new post in which experts are going to explain the concept of Auth0 and its uses. The java application development team once questioned about how to add Auth0 as an identity provider in AWS and to answer it, developers have worked with efficiency on related project that is also instanced in this post. Keep reading further to know more.
What is Auth0?
We all are aware of how authentication takes place by the traditional ways. Enter the login and password into the respective text boxes and zoom, you are good to go. The website, server gives you full access to the resources you have logged in to, and he/she can do anything and everything they want to do. Several examples of such login modules include, facebook.com, yahoo.com, gmail.com and many many others. Such authentication is very easy to implement. A certain amount of security is added to such modules which encrypt the credentials so that it is not easily hacked into by anyone. Java also offers a variety of security mechanisms that offer to protect the credentials and in all protect the Login module. But this is still the traditional approach. A more modern approach is provide roles to every user so that when he/she logs in, they are granted only certain access of the entire application. What if, I want to implement a scenario, wherein the credentials itself will be temporary. i.e., the credentials that I receive live only for a certain period of time after which I have to again request for the new credentials to continue the operations.
Why Auth0?
Many people have heard of OAuth. OAuth is a framework offered by Google to enhance the security that is being used to implement sensitive transactions or to access sensitive information. The basics of OAuth lies in providing a so called Bearer Token that can be used to access the resources in place of the user name and the password. There is yet another framework for security, Auth0. There is quite a difference in both technologies. While OAuth is used to provide a token for transactions, Auth0 is used to provide temporary credentials to a user enabling him to perform transaction for a certain period of time. Once the credentials expire, the user has to again request Auth0 to provide a new set of credentials to continue processing.
AWS and Auth0
Amazon Web Services (AWS) is a Cloud Service and it is one of the largest Cloud providers amongst all those who are available. AWS comes with a bunch of services, all of them catering to the cloud model, that allows any application to use the powerful advantages that the Cloud model suggests. Starting from sharing of the processing power, to the database, to the security system, to the sharing of computer hardware, it is one-stop-shop for any cloud requiring application.
Consider a use case wherein I would want to restrict the user from unlimited access to Amazon Web Services by simply providing him with the secret_key and access_key (they keys to access AWS). I would want to restrict the user to perform only some functions on AWS and also restrict him from indefinite access to those AWS resources by providing him with the temporary credentials. In order to achieve the functionality of temporary credentials for temporary access to AWS Services, a user has to request for the temporary credentials via Auth0. The logical flow to retrieve the credentials is as follows:
- 1. User requests for temporary credentials to Auth0
- 2. Auth0 delegates the request for the same to AWS
- 3. AWS returns to Auth0 with a set of temporary credentials if the delegated request happens to be an authentic one.
- 4. Auth0 then delegated those requested credentials to the user requesting them.
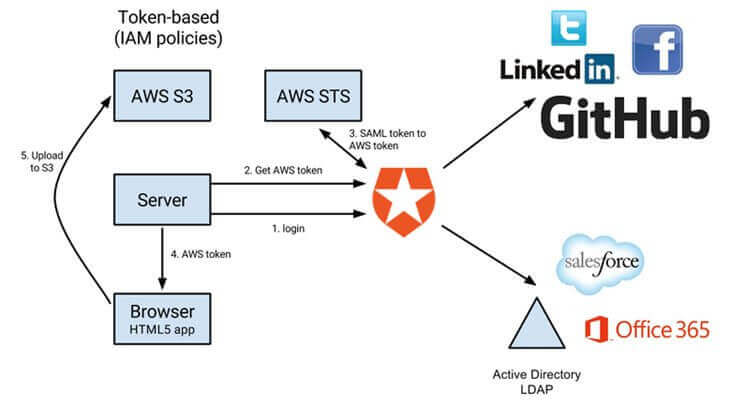
One might arise the question immediately as to why would AWS trust someone like Auth0 in the first place to give away its credentials. AWS doesn't recognize Auth0 and vice-versa. To achieve this trust relationship, one has to configure AWS to trust any request that comes via Auth0. Auth0 has to be added as an Identity Provider in AWS IAM (Identity and Access Management) in order to establish the trust relationship. Thereafter any request that will be delegated from Auth0 to AWS for temporary credentials will be considered as authentic one and therefore granted.
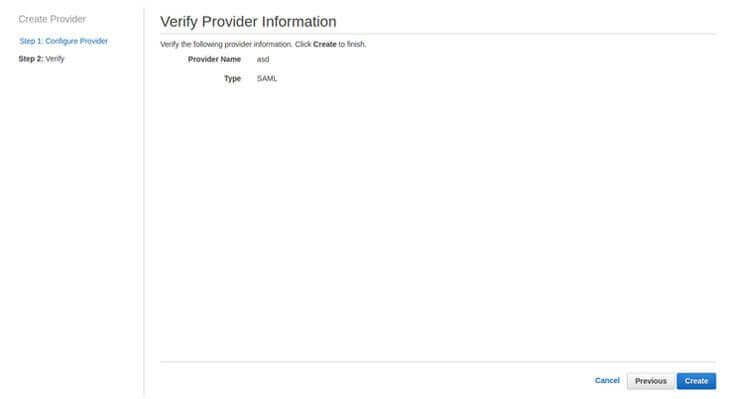
Add Auth0 as an Identity Provider in AWS
The following screen shots show how to add Auth0 as an Identity Provider in AWS.
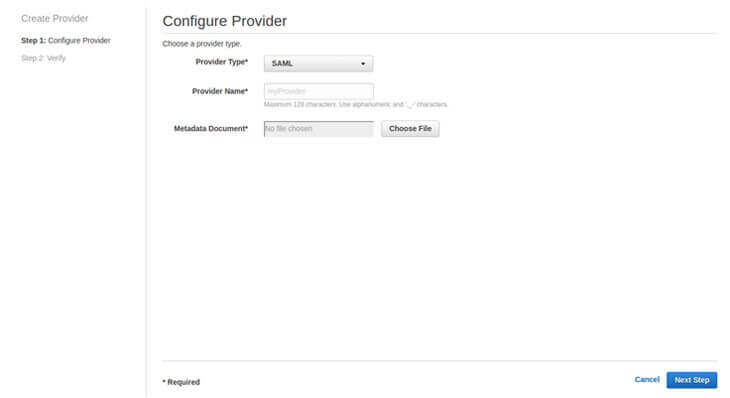
In the metadocument field, one has to upload a file that is generated by Auth0 account that serves as the actual trust relationship between the two parties.
Once the trust relationship has been established, one has to configure IAM policies so that every request from Auth0 is not given complete access to all AWS resources. We need to limit down the permissions that is given to the user when he is given with the temporary credentials. Let us see how AWS restricts the usage of AWS Kinesis resources when any request comes from Auth0. To create this, we have to create a Role in AWS Analytics Solutions that defines the permissions that have to be granted.
Create a New Role in AWS IAM.
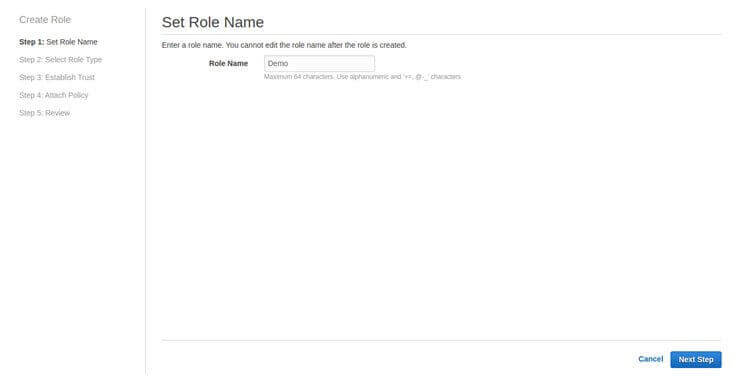
Mention any name to the Role
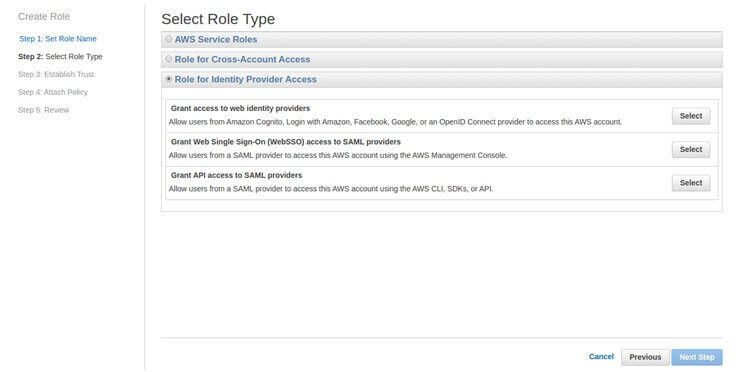
Select the option of Grant API access to SAML providers
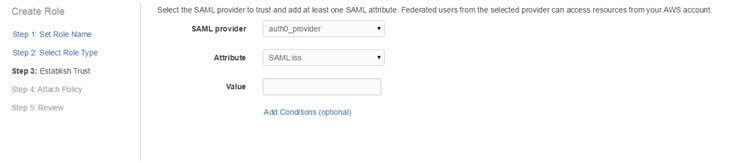
In the value section, one has to mention the name of Auth0 organization which is meant for AWS to determine that only requests from the particular Auth0 org shall be granted.
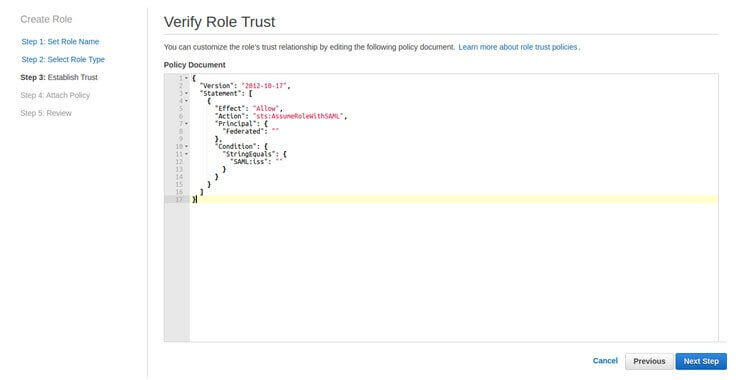
This is the visual presentation of the mutual trust between the two.
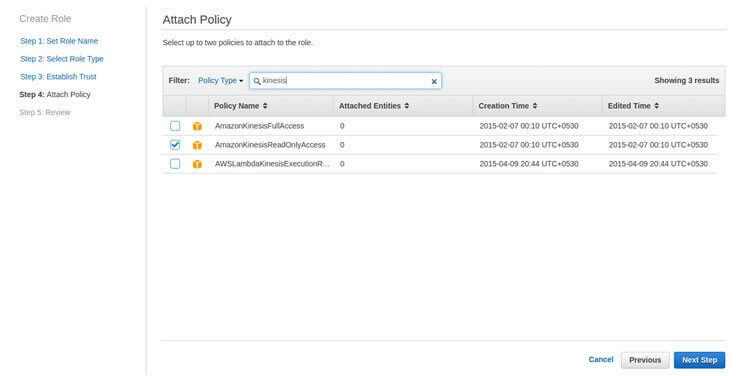
Here we have to select a policy which defines the permissions that has to be granted. Here we are selecting the policy to be Read only access to Kinesis.
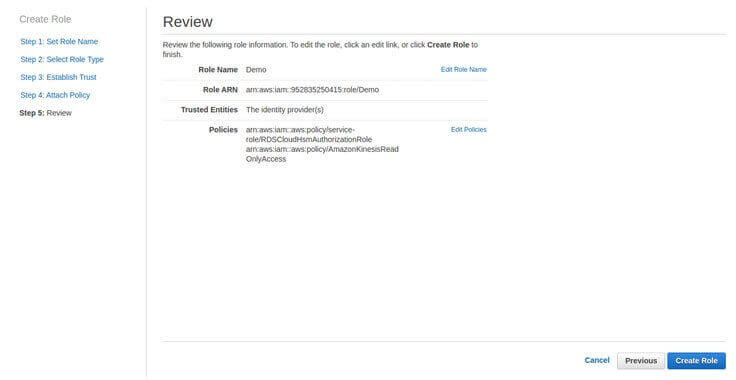
Review the policy and we are good to go.
Henceforth, any request from Auth0 to AWS with the role name as mentioned, will only be given the permissions of Kinesis read only part.
Auth0 Rules
In the above example, Auth0 expects a variable called producerStreamToGrant. It checks for its existence, and if it is found in the request, Auth0 will delegate the call to Auth0 along with the variable, and AWS in return will give back the credentials that has read only access in Kinesis only for that stream.
Visit us to gain knowledge of several modern techniques of defining authentication in JAVA.
How to use Auth0?
Auth0 is basically a service that can be accessed from a variety of programming languages via the REST service interface. We shall be discussing the Java approach to the system, because the Java team in the company has had a long experience developing the applications using Auth0 to connect with AWS. The pre-requisites for operating in Java would be a JAVA SDK installed on the machine. Java development being the strong part, the article will mainly focus on accessing Auth0 using Java.
Auth0 API?
Following are the most important Auth0 API calls that are used very frequently and are the ones that we have been using in our projects.
1. RegisterUser: This is the API call that is used to create an a new user in Auth0.
One has to always fetch an authentication token while calling any API service call to Auth0. The code to fetch an authentication token is as follows:
One has to pass the CLIENT_ID and CLIENT_SECRET provided by Auth0 while fetching the authentication token from Auth0.
2. Auth0Login: This API is used to login into Auth0 using a username and a password
3. DeleteUserFromAuth0: This API call is used to remove a user from an Auth0 account.
4. ChangePasswordURL: This API is used to change the password of an Auth0 account.
5. LogoutAuth0: This API call is used to logout from Auth0
6. FetchMetadata: This API is used to fetch the metadata of an account in Auth0
7. UpdateMetadata: This API call is used to update the metadata of an account in Auth0
8. CheckUserExistence: This API call is used to check whether a user already exists in Auth0 or not.
Hope you have grasp the concept of Auth0 and the trick to add it as an identity provider in AWS. This post is shared by Aegis Softtech Java application development team to enhance the skills of java developers. For java development related queries, kindly contact Aegis Softtech professionals.
For further information, mail us at [email protected]