

1. WHAT IS OAUTH2?
OAuth2 is version 2 of Oauth protocol which was created in 2006. It allows the 3rd party applications to obtain limited access to User accounts hosted on applications like Google, Facebook, and Twitter etc.
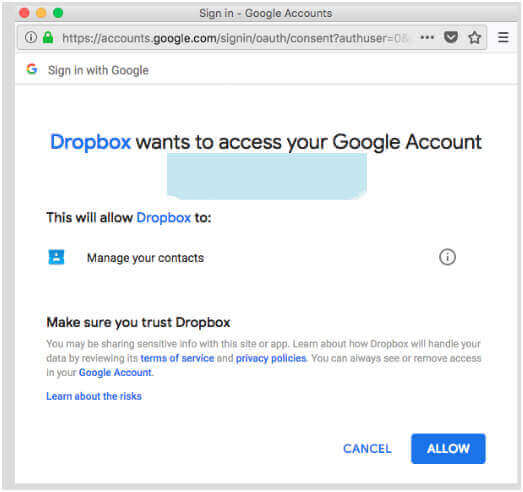
A practical example is
- You go to Dropbox. It provides you an option to signup/signIn via Google account.
- You click on it and popup appears asking for your Google credentials.
- You provide the credentials to google and it authenticates them and on success, asks you to provide permissions to Dropbox.
- Upon allowing the permissions, we are logged into Dropbox using Google’s credentials.
Some of the major points of the flow being
- We never shared our credentials with Dropbox.
- We could access Dropbox using Google’s credentials. Also based on the access provided, we can also see the options to share a file with our google contacts (provided we granted permission to Dropbox to access our contacts).
1.1 Roles in OAuth2:
There are 4 roles in Oauth2:
- Resource Owner - Generally is User
- Client Application - In above example it was Dropbox (Or 3rd party app)
- Resource Server - In above example it was Google server where our account/contacts are hosted. Third Party Apps accesses the resource server using temporary access tokens
- Authorization Server - The server which issues access tokens. In above example it was “accounts.google.com”, which authorizes the google account.
1.2 Tokens in OAuth2:
There are 2 types of tokens issued by Authorization Server
- Access Token - Third party apps use this token to access information from the resource server. It has a limited lifetime and must be sent with each request.
- Refresh Token - This is similar to REMEMBER ME option. This token has a longer lifetime and is used to re-generate the access token.
1.3 Access Token vs Refresh Token:
An access token is a character sequence that represents an authority granted to the client. Tokens symbolize distinct scopes and durations of permission, bestowed by the resource owner, and maintained by the resource service and authorisation server.
The authorization server issues the refresh token to the client, along with the access token. The renewal token is used to acquire an additional access token in the event that the current access token proves incorrect or lapses. The refresh token is used to get more access tokens that have the same or more restricted scope. These access tokens might have small lifespans and fewer rights compared to what the resource owner has permitted. The decision to provide a refresh token is discretionary and not mandatory for the authorization server.
The primary function of an access token is to retrieve data before it becomes invalid.
The refresh token is responsible for initiating a request for a new access token after the current access token has expired.
1.4 Grant Types:
Based on the nature of 3rd party applications, Authorization server defines Grant Types for obtaining the access token. More information here.
- Authorization Code Grant - Authorization server first issues Authorization code to Client. It then uses this code to get the Access token.
- Implicit Grant - Similar to the Authorization Code Grant, but Authentication server directly returns the token.
- Resource Owner Password Credentials OR password Grant - Here the user submits his credentials and then only access token is issues.
- Client Credentials Grant - Client uses client_id and client_secret to get access token.
- Refresh Token- Client uses this token to regenerate access token.
2. What are JWT Tokens?
JWT stands for JSON Web Tokens is a popular format for representing tokens. More info at here.
Visit us to avail the solution for your problem. We specialise in implementing Oauth protocol.
JWT Tokens are JSON encoded and it contains information about the issuer, claims, an algorithm used. These tokens are digitally signed and thus its integrity can be ensured.
A typical JWT Token is a string divided into 3 periods. (Periods are.)
The different parts are:
- Header: It consists of the type and the algorithm used. This info is Base64Url encoded to form the header.
- Payload: It consists of claims encoded in Base64Url.
- Signature: The last part is constructed using encoded header, encoded payload, a secret key and the algorithm specified in the header. Since the secret key is only known to issuer, the token cannot be decoded and thus its integrity is ensured.
Example: Consider following JWT Token:
|
Header (Part 1) |
eyJhbGciOiJIUzI1NiIsInR5cCI6IkpXVCJ9
|
|
Payload (Part2) |
eyJleHAiOjE1MzI3Nzc1MTEsInVzZXJfbmFtZSI6ImFkbWluQGdtYWlsLmN
|
|
Signarture
|
fJHjdPsGjzYiGs5cvR-1oZ6Sqqb5_BYid3Xl2ZyzkwI
|
In our project, the tokens will be encoded in JWT.
3. Spring OAuth2 Implementation:
In Spring implementation of OAuth2 is divided between Authorization-Server and Resource-Server.
They can reside in the same application or be 2 distinct applications.
3.1 OAuth2 – Authorization Server:
To make the approval server with the help of the spring security oauth2 module, we were required to make use of footnote @EnableAuthorizationServer as well as spread the class AuthorizationServerConfigurerAdapter.
- This issues access tokens to the clients (3rd party apps) and verifies them.
- For issuing tokens, token endpoints are provided (/oauth/token)
- For authorizing the tokens, authorize endpoints are provided (/oauth/authorize).
3.2 OAuth2 Client:
OAuth2 is a well-known authorization structure that lets 3rd apps get incomplete entry to the HTTP service, moreover either on behalf of the asset holder or by granting the third-party program the ability to get entry on its initiative. Your project has to have the spring-security-oauth2-client dependent added to it before you can begin. After that, users can provide permission for the program to access their data if identification is completed successfully.
3.3 Getting Access Token from Authorization Server:
Now, the application will use an authorization grant to get the access token. We must now submit the following request. Apply the code acquired in the first step at this point.
The application will prompt for the credentials of the client app in a separate window.
Alternatively, you may issue a comparable request using cURL.
Access token request from cURL
3.4 Resource Server:
Resource server holds the resources/endpoints which can be accessed by the client(3rd party apps), only when granted by Authorization Server.
For protecting the resource server’s APIs, Spring security adds OAuth2AuthenticationProcessingFilter in the spring security filter chain.
This filter checks the access token in the request, validates and authorizes it and then only request reaches Resource Server endpoints.
3.5 Accessing User Data from Resource Server:
After obtaining the access token, we may go to the resource server to get confidential user data.
Execute the following request:
Send a GET request to get a resource by using the following cURL command: curl -X GET http://localhost:8080/api/users/me -H "authorization: Bearer 59ddb16b-6943-42f5-8e2f-3acb23f8e3c1"
The answer will be returned.
Retrieve the answer from the resource, which includes the following information: name as "Humpty Dumpty" and email as "[email protected]".
3.6 OAuth2 Protected REST Resources:
To develop a resource server element, use the @EnableResourceServer annotation and extend the ResourceServerConfigurerAdapter class.
Getting Authorization Grant Code from User
The initial phase is obtaining an authorization permit from the resource owner using the following URL:
http://localhost:8080/oauth/authorize?client_id=clientapp&response_type=code&scope=read_profile_info.
3.7 Test the Resource Server:
Open your preferred web browser and enter the following URL: http://localhost:8082/ to access your client application.
You can choose the Login link.
You will be redirected to the login page:
- Provide the username "Andrew" and the password "abcd" as specified in the application.properties file from the authentication server.
- By clicking on the "Sign In" button, you will be sent to the very sophisticated securedPage.html template, which will display the titles "Secured Page" and "Andrew".
- Here, the functionality is operational. Now, you will simplify it more.
- You can terminate both the server and client Spring Boot applications.
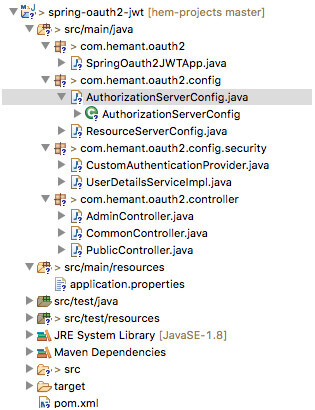
4. Project
In our project, we’ll:
- Implement OAuth2 using Spring Boot developers and Spring Security.
- The access and refresh tokens will be JWT encoded.
- Authentication will be done using OAuth2
- Further, we will be implementing authorization too.
- Resource server and Authorization server will run in a single instance.
The project Structure is as follows:
4.1 Maven Dependencies
4.2 Application properties
The application.properties file is as follows:
4.3 Spring Boot Main Application class
4.4 Authorization Server Configuration
Explanation:
- @EnableAuthorizationServer : is a convenience annotation which enables the Authorization server in the application and sets up authorization endpoints (/oauth/authorize) and token endpoints (/oauth/token).
- JwtAccessTokenConverter - For encoding tokens using JWT. Also for signing JWT tokens, Authorization server will use the value in ${signing.key}. Since this signing key is only known to Authorization server, only he can sign it and verify its integrity.
- ClientDetailsServiceConfigurer - Configures how clients (or 3rd party apps) are configured and stored. Currently, they are stored in memory. We have configured only 1 client, which will provide access tokens for grant-types (password - where a user provides his credentials and refresh_token - where a user provides refresh token value to regenerate access token). The access token issued will expire in 100 sec.
- AuthorizationServerEndpointsConfigurer - It defines the security for the Authorization server endpoints.
- For storing tokens org.springframework.security.oauth2.provider.token.store.JwtTokenStore is used, which doesn’t really stores the tokens.
4.5 Resource Server Configuration:
Explanation:
- EnableResourceServer - This enables the resource server which encompasses all the URLs which are not part of Authorization server. This sets up OAuth2AuthenticationProcessingFilter - A pre-authentication filter for OAuth2 protected resources
4.6 Authentication Provider and User Services:
In this project, for the sake of simplicity, the users are stored in-memory and authentication is provided against them only.
4.7 Controllers:
For covering cases related to Authorization, we have defined 3 controllers providing APIs for resource server.
|
No |
Name |
Config |
|
1 |
AdminController |
Its APIs can only accessed by authenticated users with role - ADMIN |
|
2 |
CommonController |
Its APIs can only accessed by authenticated users with ANY role |
|
3 |
PublicController |
Its APIs can be accessed by any user - authenticated and non-authenticated |
This security configuration is provided in ResourceServer Configuration.
5. Running the Application
1. Go to the application ROOT directory and execute
2. If the build is success, the JAR can be executed by
3. The following logs indicate that application is up and running
6. Demonstration
1. Try accessing /public/ API. It should be accessible without any restrictions.
2. Similarly try accessing any other URL (/commons or /admin). You should get access denied error.
This is because, we cannot access these without access token.
3. Get access token
We have to pass, clientId and client secret in Authorization header, set grant_type=password and also send the user credentials.
3.1 Sending improper credentials
3.2 Sending proper credentials
4. Once access token is obtained, we can access the protected resources.
5. Once access token has expired (100 sec), trying to use to accessing the same resource shouldn’t work. It should give token expired error.
6. We can use the refresh token we got earlier to regenerate the access token.
7. Let’s check Authorization part (for normal User). Get access token for normal User
8. Use the access token to access commons API
He should be able to access it, since it’s meant for all authenticated users irrespective of role.
9. Use the access token to access Admin API
This is because the user only has ROLE_NORMAL, but ROLE_ADMIN is needed to access the admin APIs. Thus authorization config is working fine
7. Securing the Application with GitHub and Spring Security
Safeguarding an app with GitHub and Spring Security is a vital phase in knowing the guarding of complex statistics and statistics.
Adding Spring Security as a dependence is all that is needed to offer security measures for the application. Seeing that you wish to perform a "social" login (representative to GitHub), you have to include the Spring Security OAuth 2.0 Client beginning inside your application:
The pom.xml file
Additionally, including that will automatically protect your application using OAuth 2.0.
Following that, you will need to set up your application so that it uses GitHub as the authentication tool. This may be accomplished by doing the following:
7.1 Create a new application on GitHub
Setting up the application.yml file
To begin, start the application.
7.2 The Significance of Securing REST APIs
REST APIs function as the fundamental structure of contemporary apps, allowing the interchange and transfer of data across different components. The need to safeguard API endpoints is particularly significant in several domains, such as banking applications that conduct monetary interactions, health platforms for managing important medical records, and online storefronts for processing customer information. Illegal intrusion, breaches of data, and additional safety vulnerabilities not only endanger user confidentiality but even provide substantial legal and monetary hazards to enterprises.
Ensuring the safety of REST APIs is not a recommended approach but an essential need at a time when cyber threats are always becoming more advanced. Unprotected APIs may be violated to be illegal entry, modify data, or interrupt services, resulting in significant repercussions for both organizations and consumers.
7.3 Why Spring Security and OAuth2?
Spring Security has become the preferred outline for handling verification and approval in Java applications inside the intricate realm of online safety. The modular and flexible design of this system makes it extremely appropriate for safeguarding REST APIs. It offers designers with a robust set of tools to impose entry rules and safeguard resources.
OAuth2, however, tackles the particular obstacles of permission by offering a consistent framework for vicarious entry. This procedure enables programs to get restricted access to a user's services by not revealing sensitive identifications. OAuth2 is well-suited for situations where third-party apps or services need regulated access to secure resources due to its adaptable nature.
Developers may create strong protection against various security risks by integrating Spring Security and OAuth2. Spring Security offers a wide range of features, including user authentication and complex authorization situations. On the other hand, OAuth2 streamlines the management of access tokens and permissions, ensuring a safe and user-friendly experience.
7.4 Using Spring Boot for OAuth2 and JWT REST Protection
REST APIs are used across all programming languages and platforms. Constructing a safe REST API is an essential resource that every programmer should include in the toolkit.
Setup for Resource Owner and Authorization Server
JWT is a suitable choice for the format of access and refresh tokens used inside the OAuth2 protocol.
OAuth2 with JWT may not be the optimal solution for a project if the following factors are deemed significant:
- A stateless protocol lacks the capability to revoke access on the server side.
- Implementing a fixed lifespan for tokens introduces more difficulty in handling sessions that last a long period while maintaining security, such as with refresh tokens.
- An essential condition for ensuring the security of a token stored on the client side
Security mainly revolves around verification, which involves verifying an individual's identification, and permission, which entails granting permission for access to services.
7.5 Build Your Client App
Return to Spring Initializr. By the spring security oauth2 example & oauth2 spring security example, you can Initiate a new undertaking using the following configuration:
- The project should be configured as a Gradle project instead of a Maven project.
- Group: com.okta.spring.
- Artifact: SpringBootOAuthClient.
- Include three dependencies: Web, Thymeleaf, and OAuth2 Client.
Transfer the project; you can then copy it to the ultimate resting place and unload it.
This time, you need to add the following dependency to your build. gradle file:
Later, you can rename it with the new Java class WebController
8. Create an OpenID Connect Application
Okta is a supplier of authentication and authorization services delivered via the software-as-a-service (SaaS) model. We provide free accounts to developers to facilitate the development of OIDC applications without any hassle.
Before starting, you must have a complimentary Okta developer account. Download and install the Okta Command Line Interface (CLI), then execute the command "okta register" to create a new account. If you already own an account, use the command "okta login". Next, execute the command "okta apps create". Choose the app name that is set as the default, or modify it according to your preference. Select the option "Web" and then hit the Enter key.
Choose the option labeled "Other". Next, modify the Redirect URI to http://localhost:8080/login/oauth2/code/okta and set http://localhost:8080 as the Logout Redirect URI.
8.1 Create a New Spring Boot App
- Returning to the Spring Initializr once more. Initiate a new undertaking using the following configurations:
- Convert the project from using Maven as the build system to using Gradle instead.
- Modify the Group to com.okta.sp
- ring.
- Replace the Artifact with OktaOAuthClient.
- Include three dependencies: Web, Thymeleaf, and Okta.
- Click the "Generate Project" button.
9. Single Sign On With GitHub
Looking to enhance your app's security with OAuth2? Check out the step-by-step Spring Security OAuth2 tutorial! In this part, you will develop a basic application that utilizes GitHub for authentication. Utilizing the autoconfiguration capabilities in Spring Boot will make this task relatively simple.
9.1 Initiating a Fresh Project
To begin, it is necessary to generate a Spring Boot application, which may be accomplished via many methods. To simplify the process, visit the website https://start.spring.io and create a blank project by selecting the "Web" dependency as the initial framework. Alternatively, do this action using the command line interface:
$ mkdir ui && cd ui
$ curl https://start.spring.io/starter.tgz -d style=web -d name=simple | tar -xzvf –
You can add a new home page.
The last need is the webjars "locator" that is available as a library from the webjars site. Spring may use the location parameter to precisely find the static files in webjars without requiring knowledge of the specific versions.
9.2 Securing the Application with GitHub and Spring Security
To enhance the security of the application, you can easily include Spring Security as a dependency. If you want to implement a "social" login feature by delegating the authentication process to GitHub, it is recommended to include the Spring Security OAuth 2.0 Client starting.
pom.xml
By using that feature, your app will be automatically protected with OAuth 2.0.
Subsequently, it is necessary to set up your application to use GitHub as the authentication provider. To do this, follow these steps:
- Create a new GitHub application
- Modify the settings in the application.yml file.
- Initiate the application
9.3 The Significance of Securing REST APIs
RESTful web services are online resources that provide specialized information. These services essentially illustrate the functionality of the REST API.
Ensuring the security of REST APIs is of utmost importance in the linked digital landscape. APIs, or Application Programming Interfaces, operate as the fundamental framework for facilitating communication between different software programs, enabling them to interact and exchange data smoothly. Nevertheless, in the nonappearance of acceptable safety protocols, REST APIs are vulnerable to many cyber risks, such as unauthorized entry, data breaches, and API misuse. Arranging security protocols such as authentication, authorization, encryption, and rate limitation may effectively safeguard sensitive data and thwart unwanted threats.
10. Conclusion
Thus we implemented the OAuth2 with Spring Security.
We used grant_type=password (where user needs to provide access token to receive access token) and grant_type=refresh_token (where user provides refresh token to generate the access token value). In addition to OAuth2 implementation, we also applied authorization to our resource server endpoints.
Note that the code shared by Java Development Company for reference purpose only. If you have any doubt or want to ask anything related to the issue, you can contact us now.
For further information, mail us at [email protected]